这里
北大青鸟深圳嘉华学校为大家搜罗了Android开发教程之Bitmap最优加载。
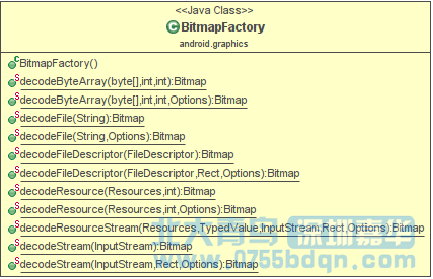
说到图片的加载就必须说BitmapFactory,看名字就知道他的作用了,就是一个生产Bitmap的工厂,下图是它的一些工厂方法:
从上图可以看到BitmapFactory可以使用存储Bitmap数据的数组,Bitmap的资源ID,Bitmap文件等做为数据源来创建Bitmap对象,具体情况看你程序中提供的数据源是哪一种。这些方法中对每一种数据源都提供了两个方法,这里需要注意一下BitmapFacotry.Options参数,这个参数很重要,因为他能够极大的减少你对内存的消耗。
BitmapFacotry.Options的InJustDecodeBounds 参数使用:
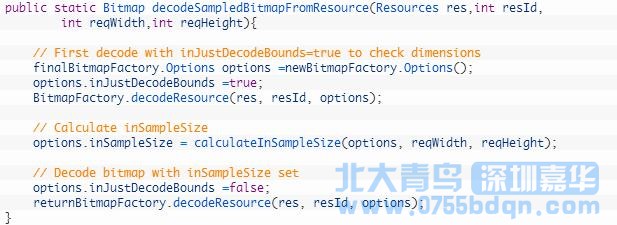
为了节省内存,很多情况下原图片都要经过缩放处理,根据控件的尺寸来处理成对应尺寸的图片,这时使用BitmapFactory创建Bitmap,很多情况下都会使用下面的代码:
注意上面中的options.inJustDecodeBounds =true的inJustDecodeBounds参数,为了避免我翻译的不准确我这里先贴出来google的原文:
If set to true, the decoder will return null (no bitmap), but the out... fields will still be set, allowing the caller to query the bitmap without having to allocate the memory for its pixels。
用我的话来说就是在decode的时候不给这个bitmap的像素区分配内存,除了这个区别Bitmap的其他信息你都能获取到。这样就有很大的意义,你既没有消耗内存又拿到了图片的信息,为你下一步图片处理提供帮助。
BitmapFacotry.Options的InSampleSize参数使用:
上一步你已经获取到图片的原始尺寸了,下一步就是要把原图缩放到你需要的大小,可以通过inSampleSize参数来设置,google原文的解释是:
If set to a value > 1, requests the decoder to subsample the original image, returning a smaller image to save memory. The sample size is the number of pixels in either dimension that correspond to a single pixel in the decoded bitmap. For example, inSampleSize == 4 returns an image that is 1/4 the width/height of the original, and 1/16 the number of pixels. Any value <= 1 is treated the same as 1. Note: the decoder will try to fulfill this request, but the resulting bitmap may have different dimensions that precisely what has been requested. Also, powers of 2 are often faster/easier for the decoder to honor.(不管你看不看英文文档我还是要把google原文贴出来,我英文比较烂,翻译的不一定准确)
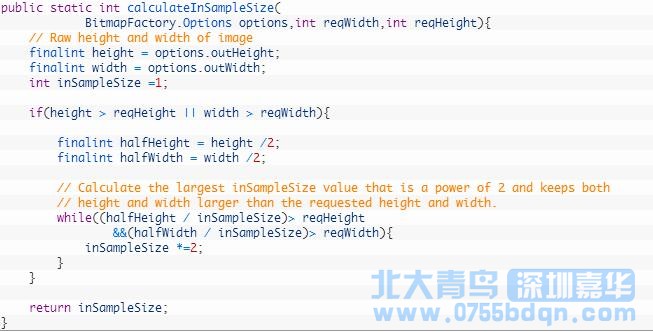
大概意思就是说这个参数可以调节你在decode原图时所需要的内存,有点像采样率,会丢掉一些像素,值是大于1的数,为2的幂时更利于运算。举个例子:当 inSampleSize == 4 时会返回一个尺寸(长和宽)是原始尺寸1/4,像素是原来1/16的图片。这个值怎么计算呢?
在decode的时候先设置options.inJustDecodeBounds =true,获取到图片参数后再设置为false,这就是decode时的技巧,下面就把完整代码贴出来,可以作为工具方法来使用:
上面的方法来自于google官网,没必要进行修改,这就是
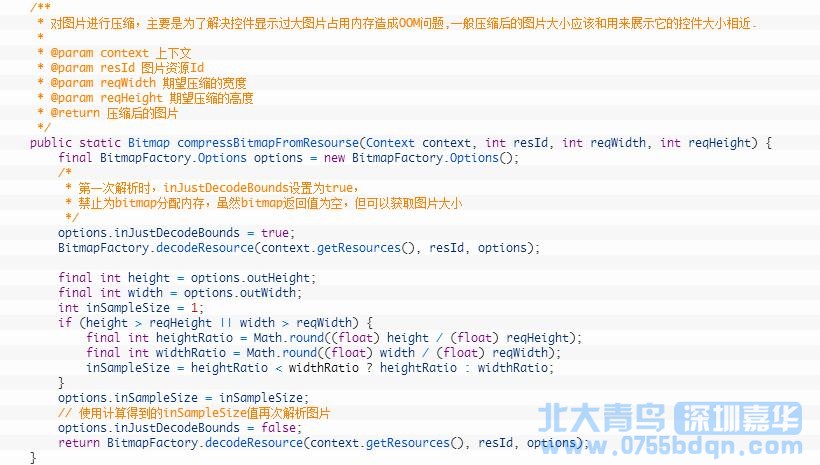
程序员的拿来主义吧,关键在于要知道为什么这么写。下面是我自己写的一个方法可以直接拿来当工具用。
以上就是Bitmap在Android中加载到内存中的一些小技巧,大家是不是以后就能很好的应用起来,避免因为加载图片引起OOM这样的问题呢?

 全国热线
全国热线


